Showing posts with label candy making 101. Show all posts

Thursday, December 3, 2009

Candy Making 101 - Marshmallow Cream Fudge by Terri

Over the last few weeks I have written several posts sharing our "family traditions".  This year Lori really got busy making candy for their friends and co-workers so I truly feel I am succeeding in passing down these traditions.

Today's family tradition I would like to share with you is one of my very favorite recipes.  This recipe is for Marshmallow Cream Fudge.  This is one of those "back of the bottle" discoveries, for I actually discovered it on the back of a Marshmallow Cream jar many, many years ago.  This is one recipe I make every year during the holidays, even those years when our funds are stretched to the limit I manage to make a double batch of fudge.  I am giving you the recipe as it was written on the back of the bottle, however, I have never made just a single batch.  I always make a double batch probably because for years you could only get Marshmallow Cream in large jars and I wasn't about to waste any of it! I think you'll discover that this fudge recipe is truly the best fudge recipe out there!

From the kitchens of:  Terri Fonville

2 cups sugar
3/4 cup butter
2/3 cup evaporated milk
1 - 12oz. pkg. mini Semi-Sweet Chocolate Chips
1 - 7 oz. jar  Marshmallow Cream
1 cup chopped pecans
1 tsp. vanilla

Line 9x13x2 inch pan with parchment paper leaving sides long & loose to enable easily removing fudge from pan.  Set aside.


Combine sugar, butter and evaporated milk in a heavy saucepan.

Melt this butter mixture at medium high stirring constantly.


Bring mixture to a full rolling boil on a medium high setting, stirring constantly. Boil for 5 minutes.

Remove from heat and stir in chocolate chips stirring until melted.

Add marshmallow cream.

Stir until well mixed.

Add chopped nuts.

Beat well.

Add vanilla. (Note: I'm using my homemade vanilla!!!) Beat until smooth.

Spoon into two 9x13 pans being carefully not to displace parchment paper.

Smooth the tops of the pans until your fudge is level.

Allow to cool on cake racks until bottom of pan is cool to touch.

Cover with plastic wrap and place in the refrigerator over night.

Remove from pan and cut into small pieces.
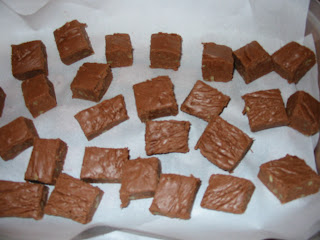
Store in airtight container in refrigerator for several weeks.
Enjoy!

Walk with God!
Terri

Wednesday, December 2, 2009

Candy Making 101 - Carmel Corn by Terri

Another family holiday favorite is homemade Carmel Corn.  My recipe comes from Jerry's mom and is hard to beat.  We've made a few modifications to the candy making process and I will share these with you as I describe it.

Carmel Corn
From the kitchen of: Leta Fonville

2 gallons popped popcorn ( I buy mine already popped at the Poppin' Place.)
Pour popcorn evenly in one giant aluminum disposable baking container or 2 9x13x2 inch metal cake pans. Set aside.

Mix following ingredients in heavy saucepan.  I use my aluminum pressure cooker:
2 cups light brown sugar or Splenda Brown sugar blend
1 cup light Karo Syrup
2 sticks butter
2 cups broken pecans or walnuts

Boil at medium temperature for 5 minutes stirring frequently:

Remove caramel mixture from heat and stir in 1/2 teaspoon soda and 1 teaspoon vanilla. Stir thoroughly.

Pour over popped popcorn.

Stir carefully.

Place in oven and bake at 250degrees for 15 minutes.

Remove from oven and stir.

Note: Jerry cut up a box for me to place on top of the baking dish to keep the popcorn in the pan.

Remove the cut box and return popcorn to the oven and bake an additional 15 minutes.  Take out and stir. Repeat process until popcorn has cooked 1 hour stirring every 15 minutes.  Be careful not to burn yourself!

After one hour remove from the oven and dump out onto waxed paper or parchment paper until cool.

Let completely cool before breaking into chunks.

Enjoy!

Walk with God!
Terri

Monday, November 23, 2009

Candy Making - Oreo Truffles by Terri

One of my favorite traditions of the holidays is candy making.  Each year Jerry & I try to make candy for our family and friends.  This year Aunt Delpha asked me to make candy for her Sunday School Class Christmas party so we are beginning our candy making a little early. She asked us to make Butterfingers, Texas Millionaires and Oreo Truffles.  As soon as mom heard we were making candy she asked us to make Carmel Popcorn - her favorite - so looks like we'll be busy this holiday season.

On Sunday we began making Aunt Delpha's candy.  The first candy we made was Oreo Truffles. We made a triple batch in order to get the 80 pieces of each type of candy Aunt Delpha needed. This is a new recipe for us.  I first saw this recipe in the Kraft Food & Family magazine last December.  Not long after I saw it in the magazine Kim, a friend from church made it for our Lifegroup Progressive Dinner.  It was delicious!  Each time I try a new recipe there is a little trial and error that goes with it and invariably I usually make a few changes when I make it the second time.  This is one of those recipes.  I followed the  recipe fairly closely the first time but wasn't really happy with the way they looked once we had dipped them in the vanilla almond bark (the Oreo center shows through the Almond Bark). They tasted incredible - but looked a little messy. For the next batch we plan to try the double stuff Oreos and  use chocolate almond bark to dip them in.  I'll let you know which we like best.

Oreo Truffles
From the kitchen of Kim Crawford & Kraft Kitchens

2 pkg. Oreo Cookies, finely crushed, divided
3 pkg. (8oz.) Philadelphia Cream Cheese, softened
3 pkgs. Vanilla Almond Bark

Crush 2 pkgs. of Oreos, measure out 9 cups and place in mixing bowl.

Add 3 pkgs. cream cheese.

Mix until well blended.

Using a small cookie scoop form 80 balls place on waxed paper - covered baking sheet.
Place in refrigerator for 1-3 hours.

Dip balls in melted Almond Bark.

Place in an air tight container with parchment paper between layers and store in refrigerator.

Any leftover melted almond bark can be stored in tightly covered container at room temperature and saved for another use.

I hope you take a little time out of this busy season to start some new traditions for your family. Candy making has truly been a fun tradition that Jerry and I started on our first Christmas together 32 years ago. You can find my butterfinger recipe by looking at my earlier post about family traditions. Happy Holidays!

Walk with God!
Terri

Monday, March 2, 2009

Family Traditions . . . by Terri


Over 20 years ago I taught at Young Children's World, a mother's day out program in our community. One Christmas a fellow teacher gave each of her coworkers a tiny box of the most delicious candy I have ever eaten. She called it "Butterthumbs." It was a homemade version of Butterfingers. She generously shared her recipe with me. Since that Christmas it has become a family tradition of ours to make "Butterthumbs". Some years our Christmas season is too busy to make this special treat, but whenever possible we make it.


"Butterthumbs" has very few ingredients. However, it is rather complicated and you must have at least 2 people to make it. Always in the past Jerry & I have made this candy together without any help. That changed in December 2004. Our daughter Lori was getting married on December 31st and she had decided in honor of her new last name - Sweet, she would have a Sweets Buffet at their wedding reception.


So, on the Saturday before the wedding Jerry & I passed that tradition on to our children. Just as we were getting started Dave's best friend Caleb arrived and couldn't resist pitching in to help. For the first time ever Jerry & I had help making this special treat!


I thought you might like to try making our favorite family candy . . .


Butterthumbs
In Heavy Saucepan Combine:
2 cups sugar
2/3 cup Light Karo Syrup
1cup water


Mix above ingredients together and boil to 300 degrees ”Hard Crack”. 
Remove quickly from heat.


Butter iron skillet completely.

While Karo mixture is heating:  Place 2 cups of “smooth” Peter Pan peanut butter in the center of a well buttered extra large iron skillet.

When candy reaches Hard Crack pour it out onto peanut butter. Stir with wooden spoon quickly and thoroughly before it cools down.


Dump peanut butter mixture out onto aluminum foil and pat into a ½” to ¼” thick form (be sure to butter your hands to keep them from burning).

Using very sharp cooking scissors, cut into ¾” strips then cut strips into 1” pieces. After pieces have cooled, set out on wax paper. (This step works best if done by 4 or 5 people since the mixture hardens before one person can get the whole mixture cut. In the past we have tried cutting with knives - but you just can't work fast enough using knives).


Chocolate Mixture:
Melt 4 or 5 pkgs. High Quality Almond Bark in double boiler. Dip candy using candy dippers into chocolate mixture, allow excess to drip off, place on wax paper and let chocolate harden. Best if left undisturbed for 24 hours. Store in cool but not cold airtight containers.


Candy dips best if placed in layers in air tight container and allowed to rest overnight before dipping. Use wax paper to separate the layers.


Walk with God!
Terri